For a new take on a tried and tested design, the new Supa-Peg 180 Degree Wing Awning ticks a lot of boxes the others miss. We look at their latest offering in this edition of DIY Driveway!
The 180-degree awning is really nothing new. For the past few years, they’ve been the go-to for a lot of people, with a simple roll-out design. The vast majority on the market just simply unroll, with legs that slide down and horizontal stabilisers that hold the awning in place; but they’re only ever as big as their length. A whopping big bit of square canvas (or cheap and nasty PVC in some cases) and that’s that.
Then came the 270-degree jobbies. They offered a lot more shade and wrapped around the back of your four-wheel drive to cover the side and rear of your rig. But they aren’t perfect, especially for those of us with utes. See, the cab and the tray (or tub) in a ute will move and flex independently of each other so, if you happen to bolt said awning to your roof and your tray/tub, that’s the only piece holding each together – suffice to say the awning won’t last long. With that in mind, those of us with utes were stuck with a bit of square canvas offering minimal shade… until now.

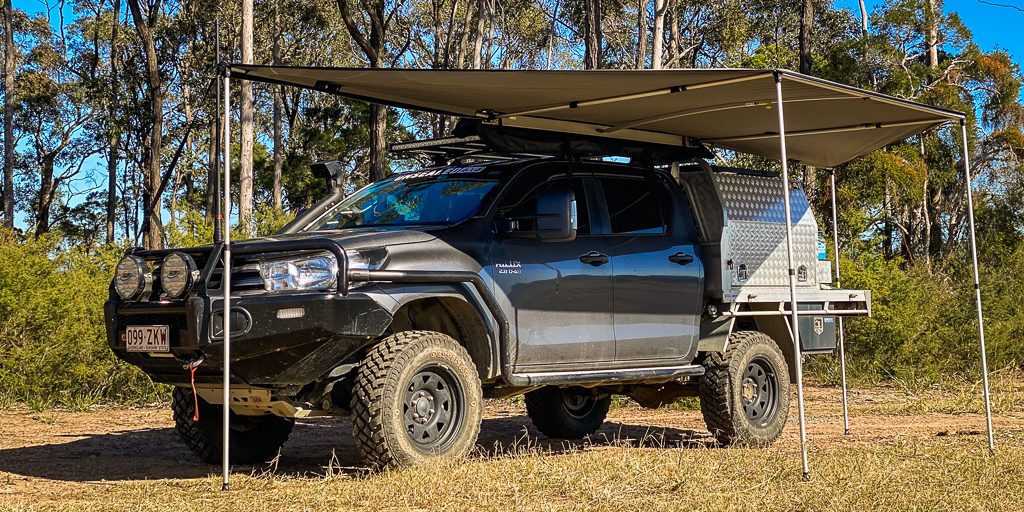
Enter the brand new Supa-Peg 180 Degree Wing Awning that really takes things to the next level, and offers close enough to double the shade of traditional 180-degree awnings. This is achieved by having both front and rear swing-out arms that allow the awning to cover the standard squared design, with additional angled pieces running off to the front and rear. For example, your standard 2×2-metre awning will give you 4m2 of shade; add the front and rear arms with canvas at nearly the same two-metre length and all of a sudden you’re up to almost 8m2, essentially doubling your shade.
What comes in the box?
In the box with the Supa-Peg 180 Degree Wing Awning comes the awning itself, a bunch of ground pegs to tie the awning down, a pair of tie-off straps for the front to the bullbar and rear to the tray (with quick-release buckles), there are a bunch of guy-ropes to attach the awning to the pegs. I also got a set of stainless-steel mounting brackets and associated mounting hardware, which allowed me to bolt it straight to the Rola Titan rack I’ve got on top of the HiLux. I also opted for the curved roof rafter pole for the central area to stop the rain from pooling, which is an optional extra you can get for it.
The new awning also features quality Aussie made 275gsm waterproof, UV-treated Coolabag poly-cotton Dyna canvas, which means it’s proper waterproof, provides 100 per cent shade, and is both rot and mildew proof. The poles that come with the awning are a quality anodised aluminium with tough Nylon fittings and knuckles that still have a bit of give, so won’t crack the first time they flex.

Something that dawned on me while packing the awning up after showing you folks how to set it up is that the bag it comes in has an extra bit of room so you’re not spending 30 minutes trying to jam it all back in there. That’s a huge plus in my book, simply as there are many alternatives that are more trouble getting it back in the bag then setting up!
Worth noting here as well is that you can get awning walls too. This’ll allow you to turn the whole thing into a tent off the side of your four-wheel drive, whether that be for a bit of privacy, safety from the creepy crawlies in the Aussie bush, or if you just happen to be in Queensland where it’s beautiful one moment and hailing the next!
What was it like to fit it?

In a word, amazing. Even for a pretty simple bloke like me, fitting couldn’t have been easier. It was just a matter of mounting the brackets to the rear mounting extrusion on the awning, lining it up ‘thereabouts’ on where you want to put it on your roof rack, and then bolting it down. The entire thing weighs about 14kg, I’d wager, but was a piece of cake for a small giant like me. If you’re not overly tall, you may need a bit of a hand getting it up into position, but once it’s there, it’s easy enough to move into position as you mount it to the roof. The beautiful part about the mounting brackets is that you can have them sitting up or down, depending on how high you want it off your roof rack; I had them sitting up as my rack is pretty low profile, whereas you’ll see Deano mounted the 270-degree Supa-Peg awning the other way, as there’s enough room under his racks to land a small plane!
How was setting it up solo?
Insofar as the setup is concerned, it was very straight forward. If you’re gonna be doing it yourself, setting out the pegs and ropes first will make life a lot easier. It’s straight forward once you’ve done that, in that you roll the centre out, put your legs down and tie that off to the two pegs you put in earlier, then unclip and swing the arms forward and back, tie them off, and you’re done.
Pack up is simply the above in reverse; the awning will self-support well enough to not cause any headaches, and the Nylon knuckles will take the weight of the canvas and poles while you’re swinging them away. A neat bit of kit that’s easy to set up and pack up yourself.

Once you’ve got it set up, the feet of the vertical poles also have a pair of holes in them for nailing (well… pegging, really… unless you’re setting it up on a pallet) down the legs on windy days so, if you’re expecting wind or value your gear, you can have it firmly planted to keep it from blowing away!
But what do you reckon, Wes? Worth the investment?
For me, with a dual cab ute with a canopy on the back, absolutely. I can only run a 180-degree awning as I’m unable to mount a 270 to the cab and the canopy on the ute. Where I’m lucky is that the design of the Supa-Peg 180 Degree Wing Awning goes well above and beyond all the standard roll-out style awnings and provides plenty of room for activities.
The Supa-Peg 180 Degree Wing Awning is covered by a two-year warranty, is 100% made in Australia and, of course, you can get the optional walls to zip on to the sides… and you can get spare parts from the legends over at Supa-Peg in case you don’t tie it down and the wind gets under it and throws it over your four-wheel drive. Oh, and it’s only $839. I absolutely rate it.

Bear in mind that this is the initial first look and set up of the awning. Chances are I’ll get back to you lot after I’ve put around three- to six-months work through the awning to let you know how it’s going, and show you some pretty pictures of where I’ve taken it on holidays (awnings deserve holidays too, ya know).
As with all the gear we look at here at Unsealed 4X4, it’s certainly one thing to give you our initial thoughts on a bit of kit, but it’s another to take it out into the wilds and put it through its paces for months on end. We’ll bring you a longer-term review down the track so you can see how well it stands up to the gentle giant’s abuse over a few months!

For more information, or to get your own, head over to the Supa-Peg website here!

